
¿Y quién no tiene una Ikea Lack en casa? :P
La mía es del primer piso compartido en el que viví y durante varios años la he ido arrastrando por si surgía el caso hipotético de que alguna vez me hiciese falta :)
Esta llevaba meses en el trastero por no tirarla.
Bien, pues ha llegado el día de reutilizarla.
Any Ikea Lack table at home? :P
I have this one since I had started to live indepently. It has been storaged waiting for the moment I may need it again :)
And that day is today!

Como sabéis el precio de la mesa es irrisorio, y como sabéis si vais siguiendo el Blog solo recupero cosas si puedo hacerlo con otros materiales que tenga por casa o con materiales cuyo coste sea prácticamente insignificante...por lo que, evidentemente, cualquiera de los proyectos que llevo a cabo podría quedar infinitamente mejor gastando dinero en materiales.
En mi caso me he propuesto gastar lo mínimo y reciclar lo máximo, así que ahí va mi "Ikea Lack hack" sin gastar ni un sólo céntimo:
As you probably know this table is totally inexpensive and if you have been already following this blog you may also know that I´m reusing stuff by expending no money or the less I can. It´s clear that if I wanted to spend some extra money in the materials the results could be much more cooler.
But I´m on the "spend the less, reuse the most" mood, so... here you have my no-money "Ikea lack hack" project:
1) La mesa era negra, donde la iba a poner combinaba mejor un mueble en tonos claros. Empecé por forrar las patas con mapas sacados de una agenda de hace mil años, pegándolos con cola y dándoles 2 capas extra de barniz de manualidades para que el papel aguante el máximo tiempo posible.
Black colour didn´t suit with the room decor, so I decided to start from the table legs by sticking some maps...after that I applied 2 coats of varnish.
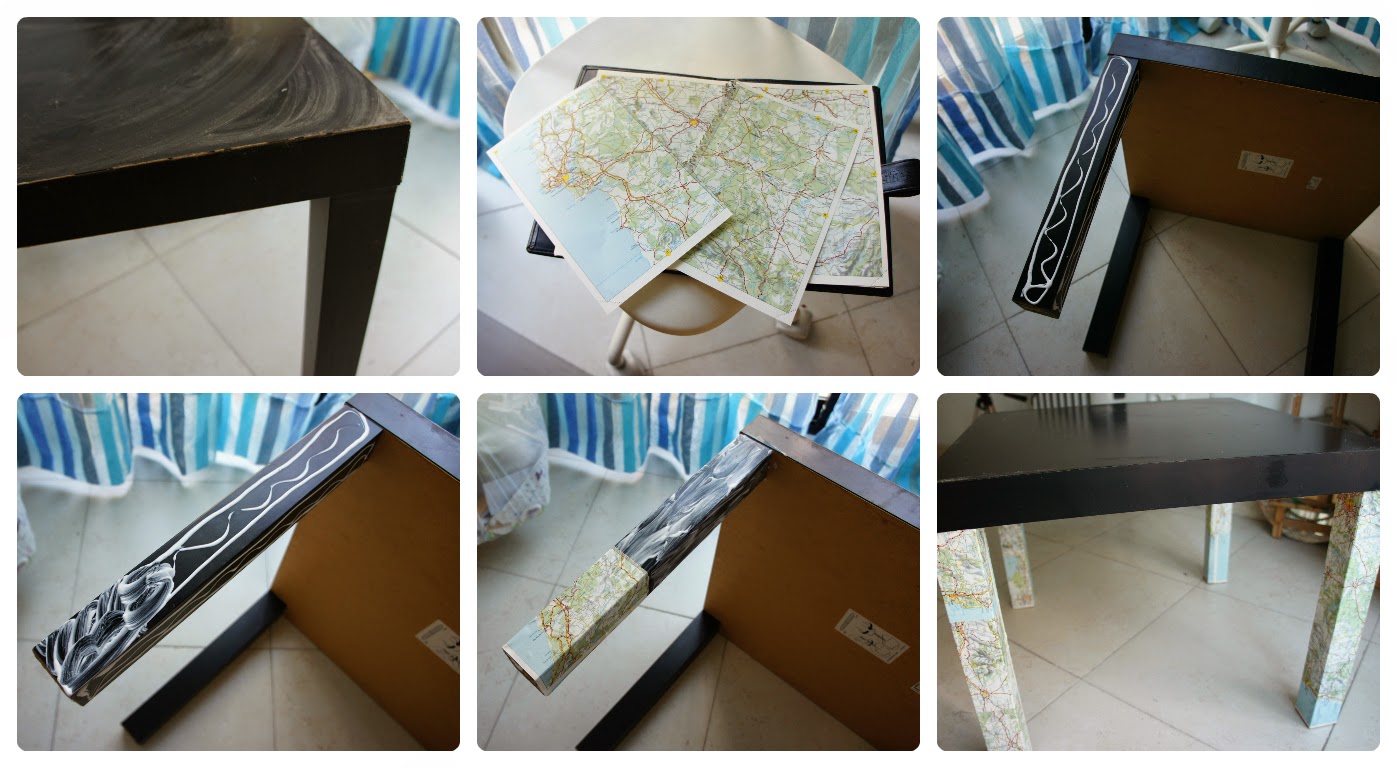
2)¿Qué hacer con la parte de arriba?....si hubiese tenido un cristal o un papel transparente adhesivo (de los que se usan para forrar libros de texto) hubiese hecho lo mismo que con las patas añadiendo el cristal o el plastiquito encima...pero como no tenía lo más sencillito fue coger un trozo de tela y hacerle un cubre-mesitas que es fácil de mantener ya que se puede sacar y echar a la lavadora cuando se quiera:
The easiest way to cover the upper side of the table with the materials I had at home was with a piece of fabric. So this is what I did.

3) Y así es como ha quedado, nada que vaya a salir en grandes revistas de decoración, pero he logrado MI OBJETIVO: alargar la vida de la mesita y re-aprovecharla sin gastar nada.
¡¡Otro Re-making conseguido!!.
And now the table is looking like this, not the most beautiful table ever but I have clearly reached MY OBJECTIVE: enlarge table´s life and reuse it without expending a single euro.
Another Re-making achieved!!


No comments :
Post a Comment